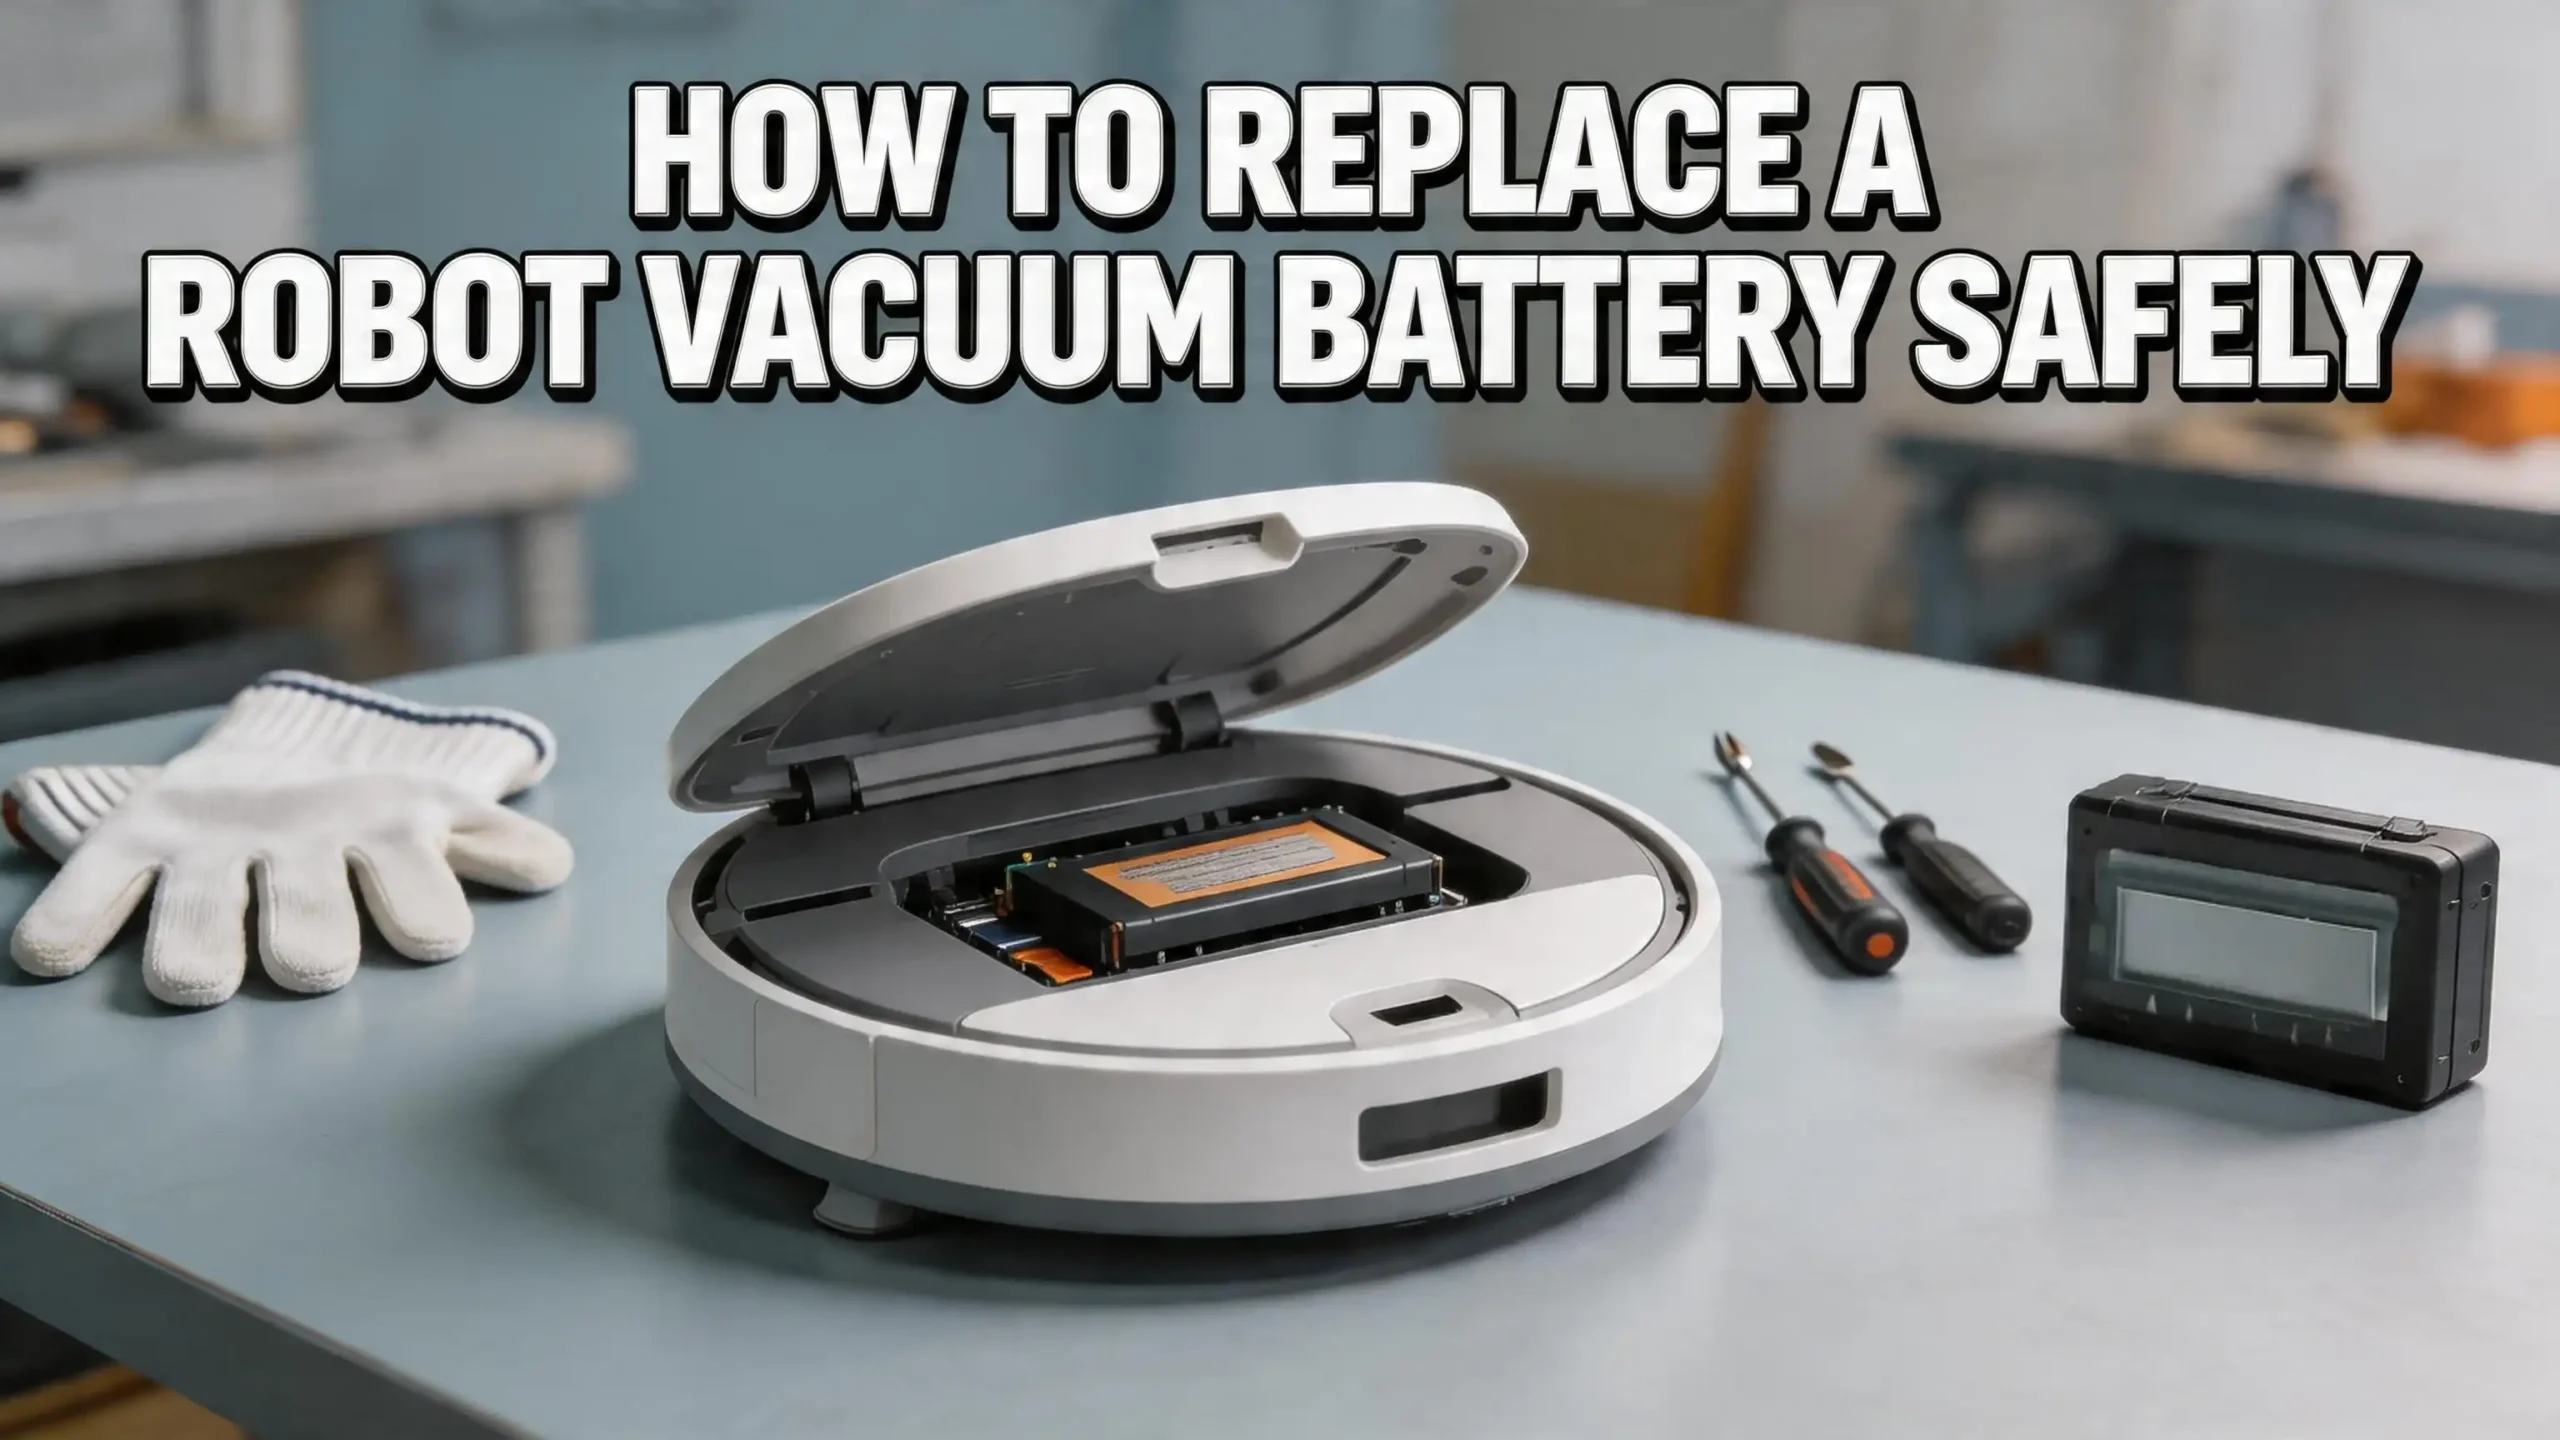
How To Replace A Built In Robot Vacuum Battery Safely?
Your robot vacuum has been your trusted cleaning partner for years. But lately, you notice it dies halfway through a job, takes forever to charge, or barely makes it back to the dock. The culprit is almost always a worn out battery.
The good news? You do not need to buy a brand new robot vacuum. You can replace the battery yourself, safely and affordably, in under 30 minutes.
Battery replacement is one of the most common maintenance tasks for robot vacuum owners. Most robot vacuums use lithium ion or nickel metal hydride batteries that last between 1.5 and 3 years before performance starts dropping.
This guide walks you through every step of the process, from identifying battery failure to safely removing and installing a new one.
In a Nutshell
- Most robot vacuum batteries last 1.5 to 3 years before they need replacement. Signs of a failing battery include shorter run times, slow charging, weak suction, and the vacuum failing to return to its dock. Do not ignore these signs because a weak battery can also cause error codes and sensor problems.
- You can replace the battery yourself on most robot vacuum models using just a Phillips head screwdriver. The process involves turning off the vacuum, removing the bottom plate, disconnecting the old battery, installing the new one, and reassembling. The whole job takes about 15 to 30 minutes.
- Always match the replacement battery to your exact model. Check the voltage, capacity (mAh), connector type, and physical dimensions. Using the wrong battery can damage the vacuum’s circuit board or create a fire hazard.
- Safety is critical during the process. Work on a dry, clean surface. Never puncture or bend the old battery. Disconnect the vacuum from the charger before starting. Pull on the battery connector, not the wires, to avoid short circuits or damage.
- Dispose of old batteries responsibly. Lithium ion and nickel metal hydride batteries are hazardous waste. Take them to a local battery recycling center, a retailer with a drop off program, or use a service like Call2Recycle. Never throw them in the regular trash.
- After installation, fully charge the new battery before use. Run a test clean to confirm everything works. Some batteries need two or three full charge cycles to reach peak performance.
Signs Your Robot Vacuum Battery Needs Replacement
The first step is knowing when to replace your battery. A failing battery does not always die all at once. It usually shows gradual warning signs over weeks or months.
Reduced cleaning time is the most obvious indicator. If your robot vacuum used to clean for 90 minutes on a full charge and now only lasts 30 to 40 minutes, the battery has lost significant capacity. This happens naturally as lithium ion cells degrade through charge and discharge cycles.
Another common sign is frequent or abnormally long charging times. A healthy battery reaches full charge in 2 to 4 hours for most models. If yours is sitting on the dock for 6 or 8 hours and still not fully charged, the battery chemistry is breaking down.
Watch for your vacuum failing to return to the charging dock. When the battery gets too weak, the vacuum may not have enough power left to drive itself back home after cleaning. You will find it stranded in the middle of a room with a flashing red light.
Decreased suction power is also a telltale sign. The motors need consistent voltage to generate full suction. A degraded battery cannot deliver that voltage, so your vacuum leaves behind debris it used to pick up without trouble.
Finally, many modern robot vacuums display battery warning alerts through their app or indicator lights. If you see a persistent battery error code, your vacuum is telling you directly that replacement time has arrived.
Understanding Robot Vacuum Battery Types
Before you buy a replacement, it helps to understand what kind of battery your vacuum uses. Most robot vacuums use one of two main battery types, and each has different characteristics.
Lithium ion (Li ion) batteries are the standard in most modern robot vacuums made after 2016. They offer high energy density, which means they store more power in a smaller, lighter package. They also have a longer cycle life, typically lasting 500 to 800 charge cycles before significant degradation. Li ion batteries charge faster and maintain a more consistent voltage throughout the discharge cycle, which gives your vacuum stable performance from start to finish.
Nickel metal hydride (NiMH) batteries are found in older models, especially earlier Roomba series. They are heavier, have lower energy density, and a shorter lifespan of about 300 to 500 cycles. NiMH batteries also suffer from a memory effect if they are repeatedly recharged before being fully drained, which can reduce their usable capacity over time.
Pros of Lithium Ion: Lighter weight, longer lifespan, faster charging, no memory effect, consistent power output.
Cons of Lithium Ion: Higher replacement cost, more sensitive to heat, requires careful handling and disposal.
Pros of NiMH: Lower cost, more tolerant of overcharging, widely available for older models.
Cons of NiMH: Heavier, shorter lifespan, memory effect can reduce capacity, slower charging.
Check your vacuum’s manual or the label on the original battery to confirm which type you need. Never substitute one type for the other unless the manufacturer explicitly supports it, because the charging circuitry is designed for a specific battery chemistry.
How To Find the Right Replacement Battery
Choosing the correct replacement battery is critical. An incompatible battery can damage your vacuum or pose a safety risk. Here is how to find the right one.
Start with your model number. Every robot vacuum has a specific model number, usually printed on a label on the bottom of the unit or listed in the companion app. Write this number down. It is the key to finding a compatible battery.
Next, check the original battery specifications. Open your vacuum (using the steps described later in this guide) and look at the label on the existing battery. Note three things: the voltage (measured in volts), the capacity (measured in milliamp hours or mAh), and the connector type. The replacement battery must match the voltage exactly. A higher mAh rating is usually acceptable and gives you longer run time, but a lower one will reduce cleaning time.
Manufacturer batteries vs. third party batteries is a common decision point. OEM (original equipment manufacturer) batteries are guaranteed to be compatible and often come with a warranty, but they cost more. Third party batteries from reputable brands can offer equal or better performance at a lower price. However, very cheap, no name batteries can be poorly made and may swell, overheat, or fail prematurely.
Pros of OEM Batteries: Guaranteed compatibility, manufacturer warranty, quality assurance.
Cons of OEM Batteries: Higher price, limited availability for older models.
Pros of Third Party Batteries: Lower cost, sometimes higher capacity options available, widely stocked.
Cons of Third Party Batteries: Quality varies by brand, may void manufacturer warranty, risk of poor fit.
When purchasing a third party battery, look for safety certifications such as UL, CE, or FCC markings. Read user reviews specifically about your vacuum model. Avoid any battery that does not clearly list its voltage and mAh on the product page.
Tools You Will Need for the Replacement
The battery replacement process does not require specialized tools. You likely already have everything at home. Gathering them ahead of time makes the process smooth and efficient.
A Phillips head screwdriver is the primary tool. Almost every robot vacuum uses Phillips screws to secure the bottom plate and battery compartment cover. Some models use smaller screws, so a precision screwdriver set is helpful. If your vacuum uses Torx screws (common on a few brands), you will need the matching Torx bit.
A small flat head screwdriver or plastic pry tool can help disconnect the battery connector. Some connectors are seated tightly and need gentle leverage. A plastic spudger is ideal because it reduces the risk of shorting any contacts compared to a metal tool.
A small container or magnetic tray is essential for keeping screws organized. Robot vacuum bottom plates often have 4 to 10 tiny screws, and losing even one can leave the plate loose and cause problems during operation.
You should also have a clean, dry, flat work surface. A table covered with a soft towel works well. The towel prevents the vacuum from sliding and protects its top surface from scratches while it sits upside down.
Optional but helpful: a can of compressed air for cleaning dust from the battery compartment, and a soft cloth for wiping down the charging contacts. Since you already have the vacuum open, this is a great time to clean internal components. Good preparation makes the entire replacement safer and faster.
Step By Step Guide to Removing the Old Battery
Now let us get into the actual process. Follow these steps carefully to remove the old battery without damaging your robot vacuum.
Step 1: Power off and unplug. Turn off your robot vacuum using the power switch. If your vacuum is sitting on the charging dock, remove it from the dock. Make sure it is completely powered down. Some models have a small power button on the side or bottom. Hold it down for a few seconds until all lights go off.
Step 2: Flip the vacuum over. Place the vacuum upside down on your clean work surface. Remove the dustbin if it is accessible from the bottom. This gives you more room to work and reduces the weight you are handling.
Step 3: Remove the bottom plate screws. Using your Phillips screwdriver, remove all screws holding the bottom plate or battery cover in place. Place each screw in your container immediately. Count the screws as you remove them so you know exactly how many need to go back in during reassembly.
Step 4: Lift the bottom plate. Gently lift or slide the bottom plate off. Some models have plastic clips in addition to screws. If the plate feels stuck, check for hidden clips or screws. Do not force it. Forcing a panel can crack the plastic housing.
Step 5: Locate and disconnect the battery. Find the battery inside the compartment. It will have a wire connector plugged into the vacuum’s circuit board. Grip the connector itself, not the wires, and gently pull it straight out. Pulling on the wires can damage them or break the solder joints on the board.
Step 6: Remove the battery. The battery may be held in place by friction, clips, or adhesive tape. Gently lift it out. If tape is involved, peel it slowly so you do not pull on any nearby wires or components.
How To Install the New Battery Correctly
With the old battery removed, you are ready to install the fresh one. This part is straightforward, but getting the details right matters for performance and safety.
Place the new battery in the compartment. Make sure it sits in the same orientation as the old one. The connector should face the correct direction to reach the plug on the circuit board. If the compartment has alignment guides or notches, use them to position the battery properly.
Connect the battery plug. Line up the connector with the socket on the vacuum’s board and push it in firmly until it clicks or seats fully. A loose connection can cause intermittent power loss during cleaning, which leads to unexpected shutdowns and error codes. Double check that the connector is straight and fully inserted.
Secure the battery. If the original battery had adhesive tape or clips holding it in place, use the same method for the new one. Some replacement batteries come with fresh adhesive strips. If yours does not, a small piece of electrical tape works as a temporary solution. The battery must not shift around inside the compartment during operation.
Pros of careful installation: Reliable performance, prevents damage to the circuit board, eliminates error codes.
Cons of rushing the installation: Loose connections, potential wire damage, short circuits.
Before closing the vacuum back up, do a quick visual inspection. Make sure no wires are pinched, no screws or debris are sitting loose in the compartment, and the connector is secure. This 30 second check can prevent frustrating problems later. A clean, well seated battery gives your vacuum the best chance of performing like new.
Reassembling Your Robot Vacuum
Putting the vacuum back together is essentially the removal process in reverse, but there are a few details worth paying attention to.
Align the bottom plate carefully. Before pressing it down, check that no wires or the battery connector cable are trapped between the plate and the body. A pinched wire can eventually fray and cause a short circuit or power failure. Line up any plastic tabs or clips with their matching slots on the body.
Insert and tighten the screws. Start each screw by hand to make sure it threads correctly. Cross threading a screw into plastic can strip the hole permanently. Once the screw catches, use your screwdriver to tighten it snugly. Do not overtighten. Plastic screw mounts crack easily under too much force. Firm and flush is the goal.
Reattach any components you removed. Put the dustbin back in if you took it out. Replace the side brushes if your model required removing them for access. Make sure everything clicks back into its proper position.
Flip the vacuum right side up and inspect it. The bottom plate should sit flush with no gaps. Press gently around the edges to confirm it is secure. A plate that is not fully seated can pop off during cleaning, especially if the vacuum bumps into furniture.
Finally, place the vacuum on the charging dock. Confirm that it sits properly on the charging contacts. Some vacuums have indicator lights that show charging has started. If the light does not come on, remove the vacuum, check the contact alignment, and try again. Proper reassembly ensures the vacuum operates safely and efficiently for the full lifespan of the new battery.
Charging and Testing the New Battery
A new battery needs proper initial treatment to deliver its best performance and longest lifespan. Do not skip this step.
Charge the battery fully before the first use. Place the vacuum on the dock and let it charge until the indicator shows 100%. For most lithium ion batteries, this takes 2 to 4 hours. For NiMH batteries, it can take up to 6 hours. Do not interrupt the first charge. A full initial charge helps calibrate the battery’s charge management system.
Run a complete test clean after the first charge. Start a full cleaning cycle and observe the vacuum’s behavior. Note how long it runs, whether suction feels strong, and whether it successfully returns to the dock. A healthy new battery should give you run times that match or exceed the original specifications listed in your owner’s manual.
Some batteries need two to three full charge and discharge cycles to reach their peak capacity. If the first run seems slightly shorter than expected, do not panic. Complete a few full cycles and the performance should improve.
Pay attention to any error codes or unusual behavior during the test run. If the vacuum stops randomly, displays a battery error, or refuses to charge, the battery may have a defective connector or may not be fully compatible. In that case, open the vacuum again and recheck the connection before assuming the battery is faulty.
Monitor charging temperature during the first few sessions. The vacuum and battery may get slightly warm during charging, which is normal. But if the unit gets hot to the touch, unplug it immediately and inspect the battery. Excessive heat can indicate a defective cell or a compatibility issue.
Essential Safety Precautions During Battery Replacement
Working with lithium ion batteries carries real safety considerations. Following these precautions protects you, your vacuum, and your home.
Never puncture, bend, or crush a battery. Lithium ion cells contain flammable electrolyte. Physical damage can cause thermal runaway, which means the battery heats rapidly and can catch fire. Handle both the old and new batteries with care. If you notice any swelling, bulging, or leaking from the old battery, place it in a fireproof container and take it to a recycling center right away.
Work in a dry environment. Water and electronics do not mix. A wet surface can create a short circuit path between battery terminals. Make sure your hands, tools, and work surface are completely dry.
Do not use metal tools to pry the battery connector. Metal conducts electricity. If a metal screwdriver contacts both battery terminals or touches the circuit board while the battery is still connected, it can cause a short circuit that damages the board. Use a plastic pry tool or your fingers to disconnect the connector.
Avoid working near heat sources or open flames. Lithium batteries are sensitive to heat. Do not perform the replacement near a stove, heater, or in direct sunlight. Room temperature is ideal.
Tape the terminals of the old battery with electrical tape before storing or transporting it for recycling. Exposed terminals can short against metal objects in your bag or recycling bin, creating a fire hazard. The EPA specifically recommends taping terminals before disposal.
Keep batteries away from children and pets. Both old and new batteries should be stored securely during the replacement process. A curious child or pet could puncture or chew a battery, which is extremely dangerous.
How To Properly Dispose of the Old Battery
You cannot simply throw a robot vacuum battery in the trash. These batteries contain chemicals and metals that are harmful to the environment. Many jurisdictions also have laws that make it illegal to dispose of lithium ion or NiMH batteries in regular waste.
Use a battery recycling program. Organizations like Call2Recycle operate thousands of drop off locations across the United States and Canada. You can visit their website and enter your zip code to find the nearest collection point. Many Best Buy, Home Depot, and Lowe’s stores also accept rechargeable batteries for recycling at no cost.
Prepare the battery for transport. Place a piece of electrical tape over the battery terminals to prevent accidental short circuits. Put the battery in a clear plastic bag if possible. Do not store multiple loose batteries together in a container, because terminal to terminal contact can generate heat and sparks.
If the battery is swollen or damaged, handle it with extra caution. Do not compress it. Place it in a non flammable container such as a metal can or ceramic dish. Some recycling centers have special drop off procedures for damaged lithium batteries. Call ahead to confirm.
Pros of proper recycling: Prevents fires in waste facilities, recovers valuable metals like cobalt and lithium, protects groundwater from toxic leaching, follows local regulations.
Cons of ignoring disposal guidelines: Risk of fire in your trash or recycling bin, potential fines, environmental contamination, danger to waste workers.
Taking five minutes to dispose of your old battery responsibly is a small effort with a significant positive impact. The materials inside are recyclable, and doing it right keeps everyone safe.
Tips To Extend Your New Battery’s Lifespan
You have invested time and money in a new battery. Here is how to make it last as long as possible.
Avoid letting the battery drain to zero regularly. Deep discharges stress lithium ion cells and reduce their overall cycle life. Most modern vacuums are programmed to return to the dock before the battery hits critically low levels. Let this feature do its job, and avoid running the vacuum on manual mode until it dies.
Keep the charging contacts clean. Dust and debris accumulate on the metal contacts of both the vacuum and the dock. Wipe them down with a dry cloth every few weeks. Dirty contacts can cause incomplete or slow charging, which stresses the battery over time.
Store the vacuum in a temperature controlled space. Extreme heat and extreme cold both degrade battery chemistry. The ideal storage and operating temperature range is 5°C to 35°C (41°F to 95°F). Do not leave your vacuum in a garage that reaches freezing temperatures or in a room that overheats during summer.
If you will not use the vacuum for a long period, charge it to about 50% first. Storing a lithium ion battery at full charge or completely empty for extended periods causes accelerated degradation. A 50% charge is the sweet spot for long term storage. Run a charge and discharge cycle every 2 to 3 months if the vacuum sits unused.
Run the vacuum on a regular schedule. Batteries perform best with regular use. Running your vacuum a few times per week keeps the battery chemistry active and healthy. An idle battery degrades faster than one in regular rotation. Consistent use is one of the simplest and most effective ways to protect your investment.
When To Consider Professional Help
While most battery replacements are simple DIY tasks, there are situations where professional assistance is the smarter choice.
If your vacuum has a sealed or glued battery compartment, forcing it open can crack the housing or void the warranty. Some high end models, particularly those with advanced mopping systems or integrated docking stations, use sealed designs that require specialized tools. Contact the manufacturer’s service center in these cases.
If you notice damage to the circuit board or wiring when you open the vacuum, stop the replacement and consult a professional. Frayed wires, burnt marks on the board, or corroded connectors indicate a deeper problem that a new battery alone will not fix. Continuing the replacement could make the issue worse.
Warranty considerations also matter. If your vacuum is still under warranty, opening it yourself may void that coverage. Check your warranty terms before picking up the screwdriver. Many manufacturers offer battery replacement as part of their warranty or extended service plans at no additional cost.
Pros of professional repair: Warranty preserved, expert diagnosis of secondary problems, correct tools and parts guaranteed.
Cons of professional repair: Higher cost (typically $50 to $100+ for service), longer wait time, may need to ship the vacuum.
Pros of DIY replacement: Low cost (just the battery price), fast completion (under 30 minutes), no shipping or wait time.
Cons of DIY replacement: Risk of voiding warranty, potential for accidental damage if unfamiliar with electronics.
For most people with a vacuum past its warranty period, DIY replacement is the best option. It saves money, is straightforward, and gives you full control over the timing and battery choice. But knowing when to step back and ask for help is equally important.
Common Mistakes To Avoid During Battery Replacement
Even a simple process can go wrong if you overlook a few key details. Here are the most common mistakes people make and how to avoid them.
Pulling on the wires instead of the connector. This is the number one mistake. The wire solder joints on the circuit board are delicate. Pulling directly on the wires can rip them loose, which creates a much bigger repair job. Always grip the plastic connector housing and pull straight out.
Buying the wrong battery. A battery with the wrong voltage, even if it physically fits, can fry the vacuum’s charging circuit or motor controller. Always verify voltage, connector type, and physical dimensions before purchasing. Do not assume all batteries that look similar are interchangeable.
Losing screws during disassembly. Robot vacuum screws are tiny. They roll off tables and disappear into carpet fibers instantly. Use a magnetic tray or a piece of tape to hold them. Count them during removal and again during reinstallation to make sure none are missing.
Overtightening screws during reassembly. Plastic threading strips easily. Tighten each screw until it is firm and the plate is flush. If you feel the screw spinning freely, you have already stripped the hole. A stripped screw mount means the plate will not secure properly and may rattle during cleaning.
Skipping the initial full charge. Putting the vacuum to work immediately on a partially charged new battery can lead to inaccurate battery level readings and suboptimal performance. The first full charge helps the battery management system learn the new battery’s capacity and calibrate accordingly.
Frequently Asked Questions
How long does a robot vacuum battery last before it needs replacement?
Most robot vacuum batteries last between 1.5 and 3 years with regular use. Lithium ion batteries tend to last on the higher end of that range, while nickel metal hydride batteries may degrade faster. Factors like cleaning frequency, floor type, and charging habits all affect lifespan. If your vacuum runs daily, expect to replace the battery sooner than if it runs two or three times per week. You will know it is time when the run time drops noticeably or the vacuum cannot complete a full cleaning cycle.
Can I use a higher capacity (mAh) battery than the original?
Yes, in most cases you can use a battery with a higher mAh rating as long as the voltage and connector type match the original. A higher mAh battery stores more energy and gives your vacuum a longer run time per charge. However, the battery must physically fit in the compartment. A significantly larger battery may not fit, and the extra weight could affect the vacuum’s movement. Always check dimensions before purchasing.
Is it safe to replace a robot vacuum battery myself?
Yes, it is safe for most models as long as you follow basic precautions. Turn off the vacuum, work in a dry area, use the correct tools, and handle the battery gently. Do not puncture or bend the battery. If your vacuum has a sealed or glued compartment, consult a professional instead of forcing it open. For standard screw secured battery compartments, the process is simple and low risk.
What should I do if the new battery does not work?
First, open the vacuum and check that the battery connector is fully inserted and oriented correctly. A loose or incorrectly seated connector is the most common cause of a new battery not working. If the connection looks good, try a different wall outlet for the dock. If the vacuum still does not charge or turn on, the battery may be defective. Contact the seller for a replacement or refund. In rare cases, the issue may be with the vacuum’s charging circuit rather than the battery itself.
How do I dispose of the old robot vacuum battery?
Never throw a lithium ion or NiMH battery in the regular trash or recycling bin. These batteries are classified as hazardous waste. Take them to a battery recycling drop off location. Retailers like Best Buy and Home Depot often accept them for free. You can also use the Call2Recycle locator to find a collection site near you. Tape the battery terminals with electrical tape before transporting it to prevent accidental short circuits.
Can a bad battery damage my robot vacuum?
Yes, a severely degraded or swollen battery can damage internal components. A swollen battery can press against the circuit board and crack it. A battery that delivers inconsistent voltage can cause the motor controller and sensors to malfunction. If you notice your battery is swollen, bulging, or leaking, remove it immediately and do not continue using the vacuum until you install a proper replacement. Early replacement prevents bigger, more expensive problems down the road.
Hi, I’m Ivy! I’m a smart home enthusiast and self-proclaimed clean freak who loves testing the latest cleaning tech so you don’t have to waste your money on the wrong one. I started HomeTechClean to share honest reviews and practical advice for anyone who wants a cleaner home with less effort.